
Teaching Technique: Canon

Exploring 3/4 with Purcell’s Minuet in D Minor
1. Follow
Students find a way to move move the following rhythmic durations in {3/4} played by the piano:
- {h.} (measure)
- {q} (beat)
- {ee} (division)
After first letting the students explore their own way of moving those durations freely, choose a common movement for each of the durations. Students then follow the piano with the corresponding movement, adjusting it to the tempo and dynamics of the improvisation.
Tip: this exercice can also be done with props such as scarves or balls. For younger students, the movements can be associated to a story that recruits that calls for their imagination (i.e. each speed is a different animal, or character, etc.)
2. Canon
Students find a way to clap those durations with their upper body. For example: tap the dotted half note with both hands in your head, the quarter notes on your hands, and the eighth notes on your shoulders alternating left and right.
Once that is established, students clap the rhythms in canon from the piano, with the appropriate claps. For more students who are more experienced, you can do the same exercise while stepping the beat.
Tip: For more beginner students, this exercise can be a “stop canon”, where the piano doesn’t play anything while the students are echoing what they heard.
3. Analysis
Analyze on the board the meter and the rhythms that the students moved, and its notation. Students can say the rhythms following the leader who points at the on the board (with or without conducting), improvise their own phrases using the rhythms, etc.
4. Reaction
Students step the quarter notes. On the signal “Hip!”, students step the eighth notes. On the signal “Hop!” students step the dotted half notes. On the signal “Back!”, students return to the quarter notes. If necessary, as a preliminary step, the exercice can be done by clapping instead of walking.
Tip: For more advanced students, the same exercice can be done on hands and feet at the same time in association and dissociation. For example, if the students are clapping and stepping quarter notes and they hear the signal “Feet Hop!”, the feet step dotted half notes while the hands continue to clap quarter notes. Instead of claps, the hand part can also be done using chopsticks or hand drums.
5. Henry Purcell: Minuet in D Minor T689
The melody of this beautiful minuet uses exclusively the rhythmic values explored in this lesson. It is composed with only 3 phrases that are 4 bars each, that we will call a, b, and c. Thus the form of the piece is ababcab.
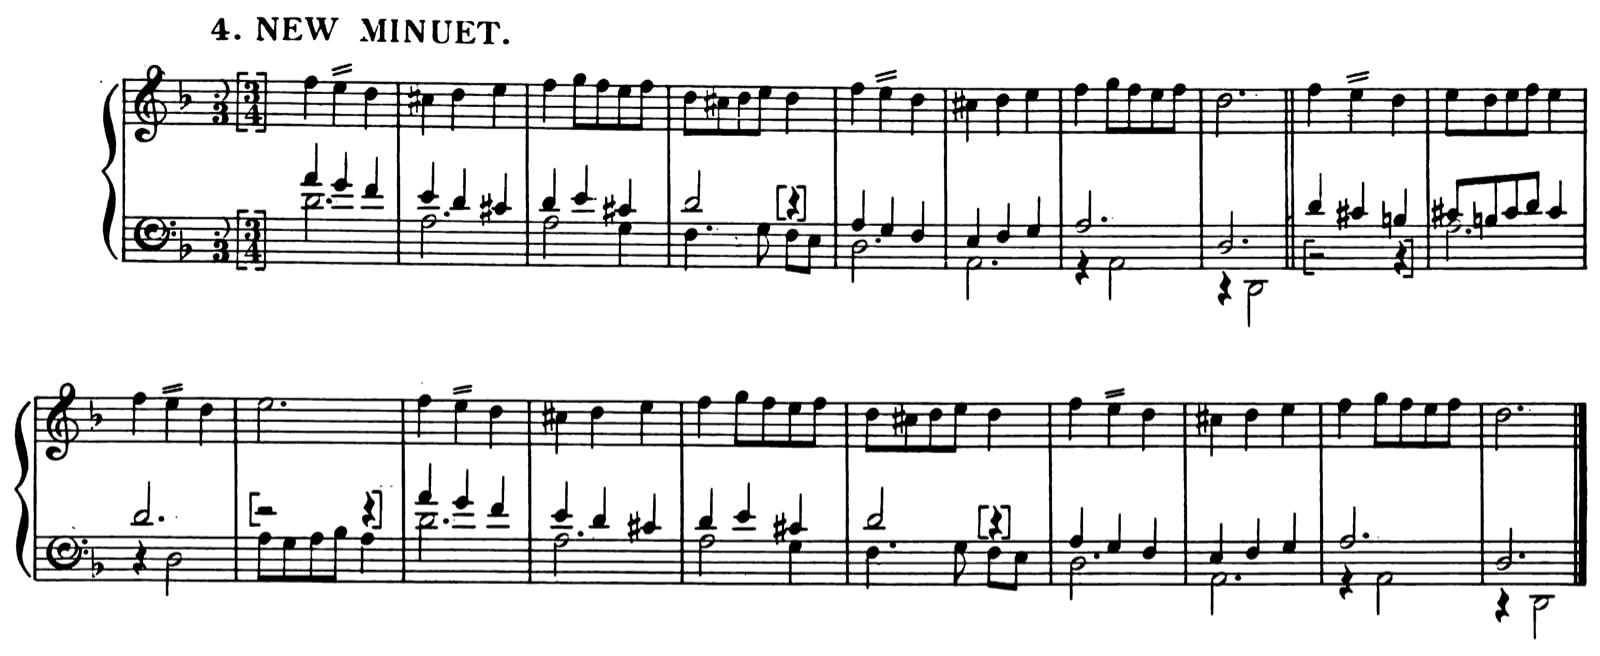
Place on the floor as many hoops as there are people, spread around the room. Students go for a walk and come back to their hoops at the end of each phrase. Depending on the phrase, they will do something different when arriving to their hoops:
- Do a pirouette or a turn on one feet inside the hoop
- Arrive with both feet
- Arrive tip toe close to the hoop without getting inside
Have the students describe in their own words how the phrases endings feel different from each other, sensitizing them to the different cadences. Then repeat the piece a few times and help them integrate the form.
Optional: for older students, read the melody in solfège. The piece is written in 3-part, so for more advanced students, it can also be read in 3 voices.
Learning Objectives: Explore measure, beats and divisions in 3/4 in the context of Purcell’s Minuet

Anatomy of a Lesson #7
This lesson plan by Dr. Annabelle Joseph is based on the notes I took during my Dalcroze training at Carnegie Mellon University. I “rescued” my notebooks from that period and I found the following from 1999. At that time, students took notes quickly between lessons. The annotations I write now come from my memories and my teaching experience at the present.
This is an introductory lesson to measures of 12 eighth notes and their common groupings. Once this is mastered, the next stage could be to work on a specific rhythmic pattern one measure in length and to practice with different groupings of the twelve eighth notes, thus changing the natural rhythmic “accents” of the pattern.
Elda Nelly Treviño Flores


Part I: Eurhythmics1
Introduction to groupings of 12 eighth notes
(Groupings of 2, 3, 4, 6 eighth notes which correspond to 6, 3, 4, 2 beats per measure)
- Warm- up
- Students listen to improvised music at the piano and figure out the pulse (6, 3, 4, 2 beats per measure of 12 eighth notes each)
- Move with the pulse
- Conduct the pulse while moving
- Students listen to improvised music at the piano and figure out the pulse (6, 3, 4, 2 beats per measure of 12 eighth notes each)
- Subdivisions of 12-eighth-note measures
- Students run freely with eighth-note melody improvised by the teacher at the piano (no distinguishable groupings in the melody)2
- When listening to groupings of eighth notes, students stay in place and move, showing the grouping of eighth notes with their movement
- If no grouping is heard, start running until a new grouping appears
- Teams: Make circles of even numbers of students, standing
- Pass an imaginary ball every 12 eighth notes they hear
- Teacher starts grouping the eighth notes as in the previous exercise while students pass the imaginary ball with the grouping3
- At “HOP” change directions
- Students take a pair of rhythm sticks
- HIP–eighth notes in hands and grouping in feet, moving through space
- HOP–eighth notes in feet and conducting with both arms4
- New teams of 5 people. Improvise movement, showing the groupings of eighth notes in this series: 6-3-2-4.
- Everybody in the team makes movements simultaneously, repeating the series a few times
- Each person does the series twice
- At “HOP,” change directions
- Same thing, but doing the series once; each person “passes the series” to an unexpected other in the circle.5
- “Geppetto’s clock shop”
- Students make teams of five people
- Students subdivide space with arms (sagittal plane) showing the groupings saying the grouping out loud
- Students line up in groups of five
- Each person shows one grouping with their arms and adds sounds to the first eighth note of the grouping.
- At the end, we have many clocks sounding at the same time6
- Students make teams of five people
Part II: Piano Improvisation7
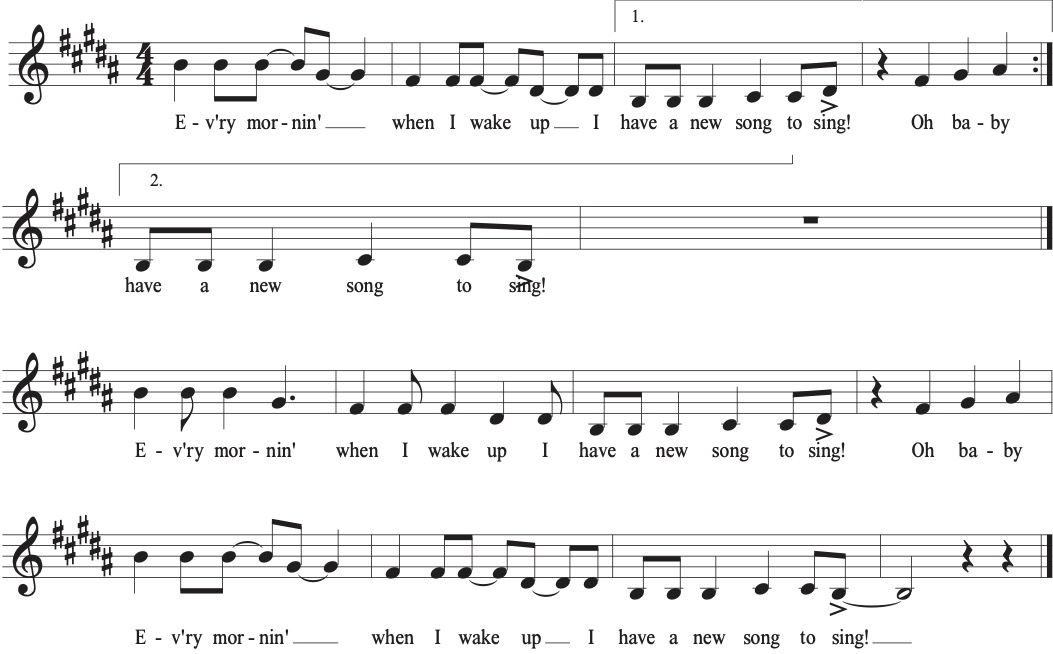
Creating a secondary melody based on the Appalachian folk song “Ev’ry Night When the Sun Goes In” in the C Mixolydian mode
- Learning “Ev’ry Night When the Sun Goes In”
- The teacher plays the song at the piano
- The entire group starts singing the song with note names and conducting while teacher plays accompaniment at the piano until the group learns it8
- Two students come to the piano
- Student 1 plays the melody
- Student 2 improvises a bass line
- Half of the group sings melody
- Half of the group sings bass line
- Repeat the same exercise with two different students
- The teacher plays the song at the piano
- Improvising variations of the melody9
- New pair of students come to the piano
- Student 1 improvises a variation of the original melody
- Student 2 improvises a bass line
- Group sings original melody pianissimo
- New pair of students come to the piano
- Group sings original melody
- Student 1 improvises a variation in a second voice canon
- Student 2 improvises a NEW melody in a third voice canon
- Repeat the same exercise with different students
- New pair of students come to the piano
- Three-voice canon
- Divide group in 3 and sing a 3-voice canon a cappella10
- Voice 1 sings the original melody
- Voices 2 and 3 improvise new melodies in canon
- Change roles
- Move and conduct in space while singing
- Divide group in 3 and sing a 3-voice canon a cappella10

Commentary by Elda Nelly Treviño Flores
- The theme of part one of the lesson is different groupings of 12 eighth notes in a measure. The teacher plays improvised music at the piano, unexpectedly changing between groupings of 2, 3, 4, and 6 eighth notes. Students walk the eighth notes while conducting according to the heard groupings, thereby changing meter. ↩︎
- This exercise is a variation of the previous one. Students step the eighth notes (at a faster tempo than the previous exercise) when no grouping is heard. Once they hear a grouping or subdivision in 2, 3, 4, or 6, they stop running and show, using free movements, the beats of groups of eighth notes. ↩︎
- One of the hallmarks of Dalcroze pedagogy is to combine individual and group work. This exercise is more challenging than the previous ones; for the exercise to work, the inner pulse of the team must be the same, and the movements to pass the ball must be gentle and flow among all the participants. Moreover, the quick-reaction response is very important to maintain the quality of the direction change. ↩︎
- This exercise goes back to individual work with the addition of arm movements. Both hands and feet show the eighth notes alternating with one another. When hands have the eighth notes, the feet will perform the grouping, and vice versa. (This is a dissociation.) The rhythm sticks facilitate listening clearly to the rhythmic figures. ↩︎
- One common strategy in Dalcroze pedagogy is the creation of a series of specific patterns, both rhythmic and/or melodic, to develop automatization and memory skills. In this exercise, the series is done twice by each member of the group. Then the series is done only once, and each person decides who does it next. The passing of the series must be done with eye contact between the person who does it and the person who receives it. Eye contact prepares the passing of the series and helps to maintain the flow of the exercise. ↩︎
- The purpose of this exercise is to create a polyrhythm in space with arm movements showing the different groupings of eighth notes within a measure of 12 eighth notes. Once the arm movements are worked through, voice sounds are added to those to create an auditory polyrhythm as well. Different poses or group configurations may be created by the teams to show the eighth-note groupings. ↩︎
- Part 2 of this lesson is designed to develop improvisation skills and is based on a given well-known melody. It also gets the Mixolydian mode in the ear. The lesson is designed for early intermediate students. ↩︎
- Another skill to learn in this lesson is to quickly memorize a melody and think of its harmony as well. One of the most challenging aspects of piano improvisation is to create a good bass line. Since most of the work through the lesson is done in pairs of students, the challenge is easier to manage. ↩︎
- This exercise develops the ability to listen to three different voices simultaneously. Since the song is already known, as the lesson progresses, it becomes more comfortable to improvise variations. The original instructions do not specify the use of certain rhythmic patterns only; however, with this restriction, the challenge level increases. ↩︎
- Even though the lesson is for piano improvisation, not voice, it is important to emphasize singing in tune. If a person imagines and sings a good melody in tune, then they will be able to improvise at the piano. Inner hearing is essential for developing improvisation skills both with the voice and at any instrument.
To make this exercise more physical, one or two students could improvise a line with movements. ↩︎

Anatomy of a Lesson #6


- Introduction1
- Movement warm-up with piano
- “Rag doll” lie on floor
- Move one limb, then another
- Allow parts of the body to move you to seated position and then standing.
- In pairs, student A taps student B, student B follows through
- Move it in space
- “Rag doll” lie on floor
- Around the circle: Bat an invisible volleyball across the circle, with a set up and a release.2
- Movement and mime
- Add sound
- Set up = anacrusis (upbeat, pick up)
Release = crusis (downbeat)
- Names around circle, in {4/4}
- Speak the name of neighbor on the crusis
- Add anacrusic greeting before the crusis i.e. “Hello, John”: {ee | h}
- Movement warm-up with piano
- Stepping patterns
- Step the beat and clap crusis, eventually to a passerby. Piano is in {4/4} with lots of different anacruses.
- Clap anacruses; clap cruses to passersby. Establish the systemization3 (x = crusis in {4/4})
{q | x ee | x e ee | x ee ee | x} - Notate
- Step the patterns of the systemization, gesturing to a passerby on the crusis
- Call attention to introverted movement (i.e. moving in one’s own space, with peripheral awareness of others, but essentially alone) and extroverted movement (i.e. moving with awareness of others, interacting, moving toward others).
- Move again with this in mind.(Introverted movement tends to be small and enclosed; extroverted movement is larger, and it causes the body to move toward—and interact with—others.)
- Watch each other in half groups, enabling a clear visual sense of introverted and extroverted movement.
- “Wayfaring Stranger”
- Teacher plays, students step: {e ee} | {htiee} This becomes a follow.
- {e ee | e q.} The new note ({q.} ) is a metacrusis (a note or notes falling away from the crusis)
- Although the actual measures start at the barline, the virtual measures of an anacrusic piece start with the anacruses. The form of the virtual measures is abaa.
- Hand out score and sing with lyrics. Discuss the meaning of the lyrics.

- Analysis of measure shape with lyrics
- Not all words will fit into the analyzed measure shape structure, so in some phrases, the measure shape will change.
- Example: mm. 5-7 “And there’s no sickness toil or trouble” en \hUeen \ej
- Here, the metacrusis is on “ness” followed by an anacrusis of only two eighth notes.
- Sing the song again
- Sing with a student conductor, being aware of the measure shape phrasing.
- Complementary rhythm
- The complementary rhythm (c.r.) is the pulse that happens where there are no new notes (either from a rest or a long note).
- At the quarter-note level:
- Clap the pattern of the song, step the beats. Identify the steps where there are no claps: that’s the complementary rhythm at the quarter-note level.
- Step the complementary rhythm while song is played.
- At the eighth-note level:
- Clap the pattern and step eighth notes, discovering the complementary rhythms at the eighth-note level.
- Step this complementary rhythm
- Do in partners, person A steps and/or claps the pattern, person B steps and/or claps the complementary rhythm.4
- At the quarter-note level:
- The complementary rhythm (c.r.) is the pulse that happens where there are no new notes (either from a rest or a long note).
- Solfège
- Sing the melody with scale-degree numbers
- Determine that the 2nd and 6th degrees of the scale are missing, so that the song is in the minor pentatonic. There are no half steps, and thus no half step dissonances.
- Then sing in syllables
- Sing the song in canon.5 Although the song is not purportedly a canon, it makes an effective canon because there are no half step dissonances.
- Sing in canon in two parts at a distance of two beats, becoming a sort of call-and-response.
- Sing in canon in three or more parts one beat apart, creating a pentatonic cluster.
- Sing the melody with scale-degree numbers

Commentary by Katie Couch
- This introduction includes aural reactions (responding to music), tactile reactions (responding to physical sensation), and locomotor gestural movement, where students use previously explored gestures to travel through the space. ↩︎
- This is a game that explores time/space/energy while also incorporating social interaction and vocal improvisation. ↩︎
- It is important to explore a wide variety of anacrusic rhythms before arranging them into a systemization. ↩︎
- Performing complementary rhythms in a small group can evoke the feeling of a folk dance, with each part contributing to a lively, interlocking texture. ↩︎
- Students could also move in canon while singing in canon, creating a process-based plastique animée that allows them to see and hear the music unfolding at different times. ↩︎
Continuous Pattern Canon
a technique where participants repeat the leader’s musical and/or physical actions in delayed succession. When the leader changes to a new pattern, the movers perform what the teacher just did.


Canons in the Dalcroze Classroom
When I was 8 or 9 years old, my mother had me listen to Franck’s Violin and Piano Sonata – she had just bought the LP and she thought I’d be interested in the 4th movement. We were the sort of family that was always singing rounds, but this was the first time I’d heard a round in classical music; I was delighted by it. How lovely to be able to hear the two instruments play tag with each other in this gorgeous, accessible piece. Many years later, in a Dalcroze workshop I attended, Herb Henke led a plastique animée to this piece, our arms reflecting the canonic piano and violin parts. The little girl in me still delighted in this; it was so simple and so rewarding.
Canons in Eurhythmics Classes
The canon form provides an excellent way into experiencing music, because it is simple to understand while its rewards take us into the complexity of layering music, that of counterpoint and harmony.
Dalcrozians know how challenging and fun are the traditional eurhythmics movement canons, where students step the rhythm of a measure (or any other predetermined amount of time) in canon with the teacher at the piano. Students need to quickly analyze and memorize what they are hearing, while stepping the patterns they’ve just heard. As a teacher, I get the kick of watching the physicalization of patterns I have just played while playing the next. Movement canons, these basic games of rhythmic counterpoint, are a staple of eurhythmics classes and assessments, and much more can be said. But this essay will concentrate on other aspects of teaching canons in a Dalcrozian way.
Introducing Canons to Children
One of the first canons I like to use with children is my arrangement of Humpty Dumpty:

The students will have been working with the three primary rhythmic units in 6/8: beats, divisions, and the trochaic rhythm. Students move the units, put them in patterns, and identify them with the rhythm words, “beat,” “run-ning-and,” and “skip-and.” They also learn these as body percussion, with specific and unique gestures for each rhythmic unit.
Sitting in a circle, the students discover the patterns of the song through this body percussion system. Once that is properly automatized (one or two lessons later), we split into small groups and do it in (their first-ever) canon – with no melody at all, just the rhythm. It is a challenging but rewarding process, and less likely to confuse because singing isn’t yet involved. Soon after, the students learn to gesture the melody using Curwen hand signs, and eventually they are ready to sing the song in canon. And, voilà, they give voice to harmony.
Using Canons with Adults
I go through much the same process in teaching canons to older children and adults: by first having them experience and learn a piece through rhythmic movement and solfège singing in one large group. Once it is time to try the piece in canon, I typically have groups of students gently step the beat in place while they are singing in canon, which helps hold the meter together; then I have the groups move that stepped beat into space, letting them experience the kaleidoscope of different parts as other voices chance by.
Using Canons to Introduce Harmony
Many times, the pleasure of singing canons comes from this special way two or more parts intertwine, with the resultant harmony being experiential but not analyzed. But in adult classes, we can also delve into discovering and identifying the harmony that results from this conjunction of melodic lines.
In beginning solfège classes I frequently introduce simple harmony with one-chord canons which are, of course I-chord canons. We start by segmenting a 1-to-1 scale into 3 sections: 1-2-3, 3-4-5, and 5-6-7-1, with 1, 3, 5, and 8 falling on strong beats and other scale degrees falling on weak beats. This quickly turns into “The Tonic Chord Canon,” which works because the tonic chord pitches all fall on strong beats.

We can find many examples of simple canons that work this way, such as “Row, Row, Row Your Boat” and “Three Blind Mice.” Not only can these all be sung as I-chord canons, but also those of the same meter can also be layered on top of each other in a type of quodlibet. I frequently assign students the task of composing their own I-chord canons for the class to sing. These can be very interesting, especially when rhythmic counterpoint emerges or when a non (tonic)-chord tone note falls on a strong beat, with resulting dissonance that gives just the right touch (or not)!
After this, of course, two-chord canons (usually I and V) can be dealt with – a slow “Frère Jacques” is a good example – and the students identify chords with hand signals. This can be further emphasized by using three or more groups, where one group sings just the roots of the chords and the other groups sing the song in canon.
As we work with recognizing and manipulating various chords, canons that feature particular progressions are enormously useful in getting the sound quality of different chords into the students’ aural awareness. Mozart’s Nachtigallenkanon is a perfect example of I-ii-V-I:

As students sing more complex canons, I like to have them be ready to stop and hold chords, identifying them by function and perhaps also by which voice of the harmony they are singing. One of my favorite canons for this purpose is “Ah, comme c’est chose belle:”

Canons at the Keyboard
As with much of solfège, these sung activities are further understood when transferred to the piano. In singing a canon, students are responsible for only one line at a time, but at the keyboard they get the challenge of putting these lines together by themselves. Playing a two-part canon between the left and right hand or treating a canon as a sing/play (playing in canon with the voice) are excellent ways to experience canonic counterpoint.
Improvised canons are also possible at the keyboard. With the use of two pianos, a fine time (and an ear-training challenge) can be had by having two students play in canon with each other, one improvising phrase by phrase while the other attempts to play the phrases in canon. This works especially well if using a small selection of predetermined phrases in an improvised order, or with a given chord progression. It is also useful to have a third person play a bordun or bassline in the chosen harmony to keep everything grounded. These types of games can also be particularly interesting when done in a church mode, which can yield fascinating harmonic modal proclivities (such as the Major II chord in Lydian).
Finishing A Group Canon
The teacher needs to decide how to end a canon. Typically, a two-part canon can be sung with Group A ending and then Group B ending alone. Or, the canon can be concluded as Group B sings the last line while Group A begins the first line. However, my favorite way to end – especially if students are moving in the classroom – is for me to give a visual cue (typically, a high hand gesture) to signal that each person comes to an ending at their own choosing, resulting in a serendipitous – and frequently pleasing – improvised finale.
Examples of Canons in Classical Repertoire
Examples of the use of canons in classical repertoire gives students examples of just how ingenious the great composers can be. The 3rd movement of Mahler’s 1st Symphony, with a minor “Frère Jacques” played in canon never fails to please young and old alike. The Minuet from Haydn’s String Quartet in D Minor (Op. 76, no. 2) provides a delicious example of the harmonic minor with its gnarly diminished 7th chords. The aforementioned 4th movement from the Franck Violin Sonata travels into beautiful harmonic territory via canon.
Other examples can be found which don’t comprise an entire piece or movement but rather happen within a piece and are worth isolating. Composers often use the related fugue within their works, starting a theme in two or more different parts of the scale; these play a very similar function as the canon and can easily be identified.
The fugue itself can be seen as a sophisticated outgrowth from the canon. Students who have immersed themselves in canons through singing, stepping, gesturing, playing at an instrument, and improvising, will be ready to tackle this most elegant of forms. But that’s for another essay.