Stretching exercises moving to the measure unit ({h.}) in {3/4} music improvised by the teacher
Identifying the binary trochaic rhythm ({e.s} a.k.a. trochée)
With the music, step the beat in {4/4}. The music will mostly consist of quarter notes, half notes, and whole notes. However, when the students hear a trochée ({e.s}), they make a gesture on the beat immediately after (while still walking)2
Do the same as before, but now clap on the beat after
Repeat the game, but now the meter changes to {3/4}
Find a partner on the beat after hearing the trochée and clap hands with each other once. Keep eye contact3
Stepping the trochée
Step and conduct the beats in {3/4}. When the students hear the trochée, they step it once on the beat after4
The teacher improvises music in {3/4}, changing the placement of the trochée to any of the beats (1, 2, or 3), playing only quarter notes on the rest of the measure
Students walk and conduct: they identify where the trochée is, and step accordingly in association5
Once the students understand the previous exercise, create a pattern of four measures: in measures one to three, move the trochée on each beat; measure four has only quarter notes. Step and conduct the pattern several times6
Moving the pattern around the circle
Students sit in circles of five, each holding a drum
Keep the same pattern as the previous exercise: each student plays one measure on the drum
This is an example of both improvisation, in that the students get to choose how they move, as well as association, as the students are matching their stretches to the music. ↩︎
Here we have an aural reaction in which students react after the musical signal (because they don’t know when it’s coming). The signal should be randomized to keep the student’s attention sharp. ↩︎
Changing the game to a partner activity will also change the amount of space used by the students: you might notice them clumping closer together in order to react on time. ↩︎
Typically, a trochaic beat is moved as a skip, although how the students step is up to the teacher and their goals. ↩︎
In this aural reaction, the signal is not changed as frequently or as randomly, giving the students a chance to truly associate with the trochée (as opposed to signaling it after they hear it). ↩︎
This type of pattern is known as a systemization, in which the trochaic rhythm is moved systematically through all of its possible placements in the measure. Then we have a dissociation, where the students step the heard rhythm patterns as their arms continue conducting the beats. These types of dissociations are difficult, since they require coordination and focus to perform with accuracy. ↩︎
This is a fun group activity that involves inhibition/incitation: each student is incited to only play one measure at a time, while keeping the whole systemization in their heads. This is a good tool for assessment on the teacher’s part. Additionally, the verbal cue of “hop” adds an element of fun and surprise. ↩︎
A folk dance is a fun way to end a lesson, as it involves the whole group working together in a light-hearted way. ↩︎
Part 1: Syncopation in Simple Meter (Binary Beats)
Go for a walk with my music. Bounce the ball when it tells you.
When you hear a syncopation pattern, stop moving. When you hear it again, move forward. Keep the balls moving!
What time are we in?
On what beat does the pattern begin? (beat 1)
If the syncopation pattern begins on beat 2 move backwards/forwards.
If the syncopation pattern begins on beat 3 move sideways/forwards.
If the syncopation pattern begins on beat 4 lay down and rest!
Seated in a close circle: tap in four different places: Floor, Knees, Hands (with neighbor), and Head.
Changes!
At 1, clap a syncopation to yourself on that beat.
At 2, clap a syncopation to yourself on that beat.
At 3, clap a syncopation to yourself on that beat.
At 4, clap a syncopation to yourself on that beat.
Notice what beat is displaced at each location.
Students call the changes!
Syncopation in Movement.
Move in 4, tap on beat 1.
At 1, step a PUSH LEAP AND on that beat.
At 2, step a PUSH LEAP AND on that beat.
At 3, step a PUSH LEAP AND on that beat.
At 4, step a PUSH LEAP AND on that beat.
Instructor steps the following Systemization, the students analyze and step it themselves: {|q q q q | eq eq q |} {|q q q q | q eq eq |} {|q q q q | q q eq e|} {|q q q eetie | ee q q q |}
Write the Systemization on the board.
Perform the Systemization using Coldplay’s Viva la Vida.
Discover the rhythmic ostinato that underlies the music
Part 2: Rhythmic Patterns in Compound Meter (Ternary Beats)
Take hands in a circle:
Move as the music tells you:
Move in a stylized SKIP AND together as a group.
Go for a SWING by yourself
Go for a GLIDING AND with a partner
Go for a STEP TALL with a partner
Notice the harmonies that I play with each of these patterns
SKIP AND = Sub‐Dominant= {q e}
SWING = Tonic = {q.}
GLIDING AND = Dominant 7th = {eee}
STEP‐TALL = Any other chord = {e q}
If I play the harmony, move the pattern!
Sitting in a circle with eyes closed, each person taps on the shoulders of the person behind them. Using these patterns, the students must pass the rhythms around correctly.
Students toss and catch scarves in a circle to improvised music in compound meter. If I sing a {ssssss} then move to the right and catch the scarf of the person on your right. If I sing a ea. asez then move to the left and catch the scarf of the person on your left.
Rhythmic patterns are written on the board. Students must improvise Antecedent and Consequent phrases using these patterns the instructor points these patterns.
Movement through space2 The students walk with the piano, taking one step with each sound they hear.
The melody combines phrases in halves, quarters, eighths, sixteenths.
Simultaneously, while they walk the rhythmic figures, they do the following gestures with their arms:3
When they hear an ascending melody, they open their arms high.
When they hear a descending melody, they cross their arms.
When they hear a melody in the same place, they open their arms to the sides..
Analysis4 The students go to the board and, with the help of the teacher, they analyze what they heard at the piano. The aim is that the students write figures of halves, quarters, eights, and sixteenths.
Once the beat subdivisions are written, the students play the conductor. Using wooden sticks, students perform the rhythmic figure the teacher signals at the board in a two-beat measure.
One student of the group becomes “the conductor” and indicates the beat subdivisions on the board.
Another student does the same thing, adding dynamics.
Now, instead of clapping with both sticks, the students perform each rhythmic figure on a specific body part (using the sticks):
Head: halves
Stomach: quarters
Biceps: eighths
Shoulders: sixteenths
Rhythmic improvisation
Sitting in a circle, the students freely improvise rhythmic patterns with their sticks, incorporating the rhythms used in the previous exercise, including doing the rhythms using the corresponding body parts, as they did in “the conductor.”
The teacher proposes an ostinato with the rhythmic pattern of the first two measures of the song “A Melody in Minor”.6
Once the students practice the ostinato one by one, do two measures of a free rhythmic pattern followed by the two-measure-ostinato until each student of the group gets a turn.
Together with the teacher, the group sings the D harmonic minor scale ascending and descending.
After the group practices the scale, they form small teams to create their own version of the scale, incorporating the rhythmic figures they learned in the previous exercise.
Each group sings their version in front of the others.
Either freely or with the help of a harmonic progression played by the teacher at the piano, the students improvise melodies in D harmonic minor using the rhythmic figures from before.
The teacher sings several examples of two-measure phrases in D minor, using pitch names.
Students imitate immediately after.
Same exercise as before, now tapping the rhythmic pattern on the corresponding body parts according to what they hear.
One student proposes a similar phrase and the group repeats it, including rhythmic tapping on the body.
The group is divided into pairs. Repeat the same exercise: one partner sings an improvised two-measure melody and the partner imitates, doing body tapping.
Switch roles.
A Melody in Minor
Anne Clàire Rey-Ballet
English translation by Elda Nelly Treviño Flores
Either sitting or laying on the floor, students listen to the piece played by the teacher
Students sing along until they memorize it with note names.
Students play the melody with their instruments.
The teacher places color circles representing functions of chords.
Red = tonic
Blue = subdominant
Yellow = dominant
Students walk to the corresponding circle according to what they hear.10
They sing along while the teacher plays the song at the piano.
The group is divided in two:
Group A: Sings and does the rhythmic patterns in their bodies.
Group B: Walk to the corresponding circle according to the harmonic progression.
Then, groups change roles.
Melodic improvisation based on “A Melody in Minor” The teacher plays the melody two measures at a time.
Students improvise on the two measures they just heard, maintaining the rhythmic pattern but changing notes.
The teacher invites willing students to solo in front of the group. They may change the rhythmic pattern, but must maintain the harmonic progression.
Commentary by Elda Nelly Treviño Flores
An important aspect of Dalcroze education is to incorporate improvisation exercises throughout the lesson. ↩︎
The first part of the lesson is dedicated to discovering the rhythmic values and patterns of the song, differentiating them with gestures and body parts. ↩︎
This is a quick-reaction exercise where students bodily react in a specific way according to what they hear. ↩︎
Here, students first experience music with their senses. Then, they are ready to analyze the music. This is the Dalcroze principle of experience before analysis, where students have a direct experience with a musical concept before encountering notation or a definition. ↩︎
It is important to always combine individual and group work, since a distinctive trait of Dalcroze education is its group work along with solo work. ↩︎
The teacher always demonstrates first what students are asked to do, particularly in children’s classes. Students imitate several times until they are ready to propose their own versions. ↩︎
The second part of the class is dedicated to solfège, focused on scale patterns in D harmonic minor. ↩︎
The improvisation exercises in D minor prepare students for learning the song. ↩︎
Listening to the song “A Melody in Minor” sounds familiar, since students have been singing in D minor, using the rhythmic patterns found in the song. Therefore, they will learn the song quickly. ↩︎
An important aspect of Dalcroze solfège is sharpening the harmonic ear through listening to harmonic function as presented in a piece of music. ↩︎
Sitting in a circle, sing “The Shoemaker,” using distinct motions for each pattern.
Isolate each motion by speaking them while tapping different body parts.
The Shoemaker
Traditional
Let’s visit the Shoe Factory and make some shoes!
Approach the “door” to the factory and sing the song to unlock it.
In this room is a [e.g., Tapping] machine: stand in a circle and gesture/speak “tap, tap, tap.” Explore forte/piano. Accompany from the piano.
The machine starts to rumble, and out comes a pair of shoes: [fast shoes!] Put on your fast shoes and rush about the room. If you hear “WHOOPS,” stop and re-tie your shoes. Accompany from the piano.
Take off your shoes and go to the next room.
At this point, repeat the sequence until all three patterns have been practiced (and three pairs of shoes have been made).
Get ideas from the students: water shoes, heavy dinosaur shoes, dancing shoes, etc. Depending on their ideas, work in nuance at the piano. For instance, if they wear cloud shoes, they float with the music, following changes in tempo.
Depending on time/age: In the fourth room, there is an old machine. “I don’t know what it does, but it sounds like this…” (play a pattern on the piano). Which one does it sound like? Try saying/gesturing it. Try saying/gesturing another.
Play the patterns on drums.
With drums, practice medium, little, and big taps (i.e., {q}, {e}, and {h}).
The drums want to learn these patterns, too — let’s help them with our words.
Speak and play each rhythm. Coach students’ movements and practice. Listen to each other. Remember: “slow” = big, “fast” = small.
Musical Goal: Beat, Division and Multiple Movement Goal: Move with the music that you hear, correctly identify which part of the pizza you are currently moving on.
Materials
Rubber/silicone ‘spots’, hoops, or felt circles to represent pepperoni (at least 2 per student, ideally red)
Activity
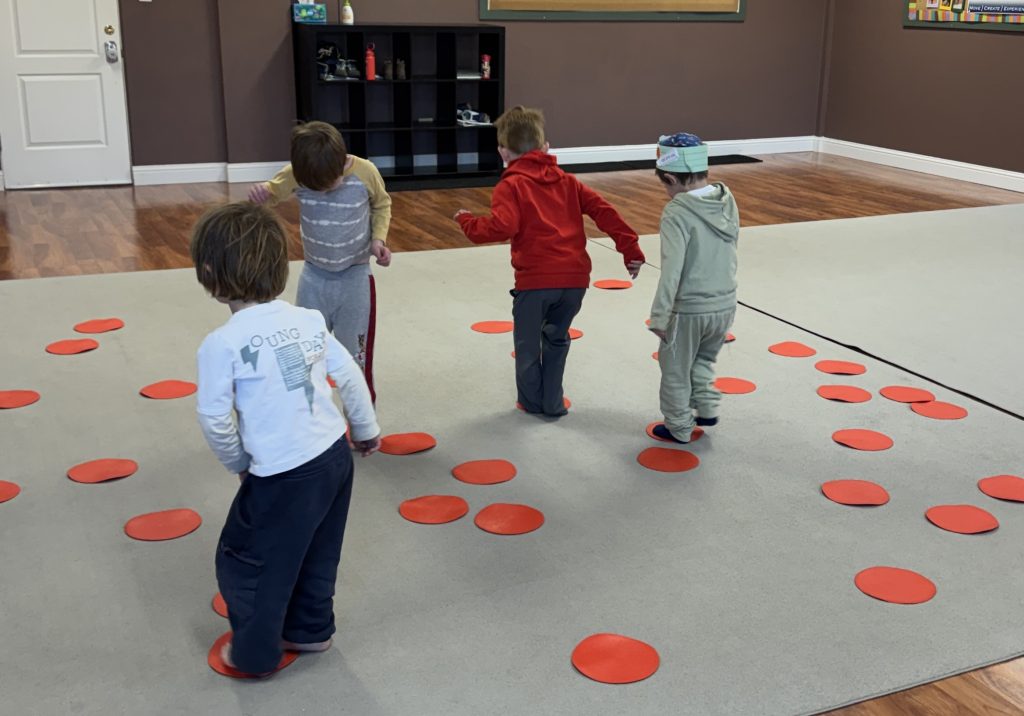
Set up the pizza Spread the spots on a carpet or in a specific area of the room. (Bonus if you have a circular rug.)
Explain that you have created a giant pizza. To avoid the gooey cheese, students may step only on the pepperoni you have placed on the floor.
Pepperoni (beat, e.g., {q}) Each student begins standing on one pepperoni (spot).
With a musical cue (drum, piano, or voice), students jump from one spot to the next.
Once they are comfortable responding to your cues, settle into a steady beat pattern.
Say “yum, yum, yum, yum” or “red, red, red, red” while moving on each pepperoni.
Cheese (multiple, e.g., {h}) The cheese is gooey and harder to move through.
Ask students to imagine the cheese sticking to their feet as they walk to other cheesy places.
The goal is to help them feel slower movement by imagining getting stuck in the cheese.
Students must stay on the pizza and walk among the pepperoni.
Play music that feels cheesy and gooey to accompany the movement.
Optional: say “cheeeeese” or other words you use for this note value while moving.
Crust (division, e.g., {ee}) Move along the crust of the pizza, around the outside of the pepperoni formation.
Use crust-like music to encourage a crisp movement.
You may describe the crust as cracker-like, where each step pokes a hole in it.
Optional: say “crust-y, crust-y” or other words you use for this note value while moving.
Match this activity with skipping music in a major key.
When it’s raining, we stay indoors. (Children sit by the teacher.)
Match this activity with music in a minor key.
Alternate a few times, so that the children hear the difference.
Then, students might suggest other ways to move when it’s sunny or activities to mime when they are stuck indoors and sitting near the teacher. Adapt the music to match these activities, always keeping the distinction between major and minor clear.
Once students hear the difference quickly, they love to learn the words “major” and “minor.” They may like to draw a picture, alone or collaboratively, that illustrates the feelings of major and minor and something to represent the activity we did (sunny sky vs. cloudy sky, etc.).
This activity can be followed up with a song that demonstrates major and minor, such as Raining Again Today/Sunny Again Today (traditional Orff). I like to have the children chassé in a circle when the song says “sunny” and sit when it’s “raining again.” Eventually, they figure out the major and minor character from the introduction and get ready for the appropriate action.
The teacher can assess mastery by playing several major or minor introductions successively to test the students’ response.
Establishing the Meter: Use the balls to demonstrate 4-time with the pattern: Bounce – Catch – Toss – Catch.
Responding to the Amphibrach (beat patterns):
When you hear an amphibrach → Turn to the right at the next measure and stay facing that direction until the next amphibrach cues another right turn.
Teacher plays amphibrach rhythms on beat 1 (e.g., {e q e q q} )
Afterward, discuss: On which beat did you feel the amphibrach? (Beat 1)
When you hear an amphibrach beginning on another beat → Turn to the left.
Teacher plays amphibrach rhythms on beat 2 (e.g., {q eetieee q} )
When you hear an amphibrach beginning on beat 3 → Take one step backward.
Teacher plays amphibrach rhythms on beat 3 (e.g., {q q e q e} )
When you hear an amphibrach beginning on beat 4 → Take one step forward.
Teacher plays amphibrach rhythms on beat 4 (e.g., {q q q eetie| ee q q q})
Notation Work:
Notate each version on the board.
Then rewrite them using different beat values.
E.g., if the beat were notated with {e}, {q}, or {h}
Add Dalcroze Time Signatures to compare how each placement functions in the measure.
E.g., {4/e}, {4/q}, {4/h}
Learning Objectives: Students will aurally identify and physically respond to amphibrachs in various positions within a 4-time measure, and accurately notate the rhythms they perceive.
This first section is all in {6/8}, but without introducing terminology or notation. The aim is to let students experience the natural “sway” of three.
A Section
Students stand in a circle. Teacher sings the A section. At the end of each phrase, everyone claps {e | q.}
Teacher briefly explains the lyrics—someone longing for a loved one across the sea.
Sing and step the {q.} , swaying in place.
Step it while clapping {e | q} toward a passing student (“passerby”).
On the 4th repetition, the passerby becomes a partner; students say “hello” on the claps.
B Section
Teacher teaches the B section.
Students sway with partners.
On the 4th repetition, partners separate, saying “good-bye” on the {e | q.}
Combine A and B sections.
Next Class
Turn this into a quick-reaction “follow” activity with changes in section length, style, tempo, and dynamics. The teacher may incorporate modulations.
II. Oh, What a Beautiful Mornin’
A. Introduction to 3/4
“Step my treble (right hand), clap my bass (left hand).”
Teacher plays:
RH: {q q q}
LH: {h.}
Ask: “How many claps per step?” → Three!
B. Names and Body Percussion
Notate {h.} and {q q q} on the board.
{q q q} = “beat beat beat”
{h.} = “three”
Body percussion:
{q q q} → patsch
{h.} → circular clap
Teacher leads; students echo while speaking rhythm names.
Going around the circle, each student creates two measures using “beat beat beat” and “three”; class echoes.
C. Create 4-Measure Patterns
On the board, begin with four measures of {h.}
Students choose which measures to substitute with {q q q}
End with a pattern such as: {q q q | q q q | h.} | {h.} |
D. Follows
Students “follow” patterns in their feet using {h.} and {q q q.}
E. Sing the Refrain
Sing using rhythm words.
Teach the lyrics.
Students discover that in phrases two and four, the dotted quarters are tied—twice as long—and can be named “six.”
Full refrain pattern:
| {q q q} | {q q q} | {h.} | {h.} |
| {q q q} | {q q q} | {h.tie}|{h.} |
| {q q q} | {q q q} | {h.} | {h.} |
| {q q q} | {q q q} | {h.tie}|{h.} |
F. Step the pattern while singing.
G. Choreograph with a ball around the circle.
H. Complementary Rhythm
(“The complementary rhythm is the rhythm that occurs at a given pulse level when no new note is sounding.”)
Sing the song while clapping the beat ( {q} ) beginning on each long note.
Repeat, but begin the clapping one pulse after the long note → complementary rhythm.
Step the refrain pattern while clapping the complement.
Step the complement while clapping the rhythm.
Step only the complement—work toward making it feel natural, musical, and independent.
Students find a way to move move the following rhythmic durations in {3/4} played by the piano:
{h.} (measure)
{q} (beat)
{ee} (division)
After first letting the students explore their own way of moving those durations freely, choose a common movement for each of the durations. Students then follow the piano with the corresponding movement, adjusting it to the tempo and dynamics of the improvisation.
Tip: this exercice can also be done with props such as scarves or balls. For younger students, the movements can be associated to a story that recruits that calls for their imagination (i.e. each speed is a different animal, or character, etc.)
2. Canon
Students find a way to clap those durations with their upper body. For example: tap the dotted half note with both hands in your head, the quarter notes on your hands, and the eighth notes on your shoulders alternating left and right.
Once that is established, students clap the rhythms in canon from the piano, with the appropriate claps. For more students who are more experienced, you can do the same exercise while stepping the beat.
Tip: For more beginner students, this exercise can be a “stop canon”, where the piano doesn’t play anything while the students are echoing what they heard.
3. Analysis
Analyze on the board the meter and the rhythms that the students moved, and its notation. Students can say the rhythms following the leader who points at the on the board (with or without conducting), improvise their own phrases using the rhythms, etc.
4. Reaction
Students step the quarter notes. On the signal “Hip!”, students step the eighth notes. On the signal “Hop!” students step the dotted half notes. On the signal “Back!”, students return to the quarter notes. If necessary, as a preliminary step, the exercice can be done by clapping instead of walking.
Tip: For more advanced students, the same exercice can be done on hands and feet at the same time in association and dissociation. For example, if the students are clapping and stepping quarter notes and they hear the signal “Feet Hop!”, the feet step dotted half notes while the hands continue to clap quarter notes. Instead of claps, the hand part can also be done using chopsticks or hand drums.
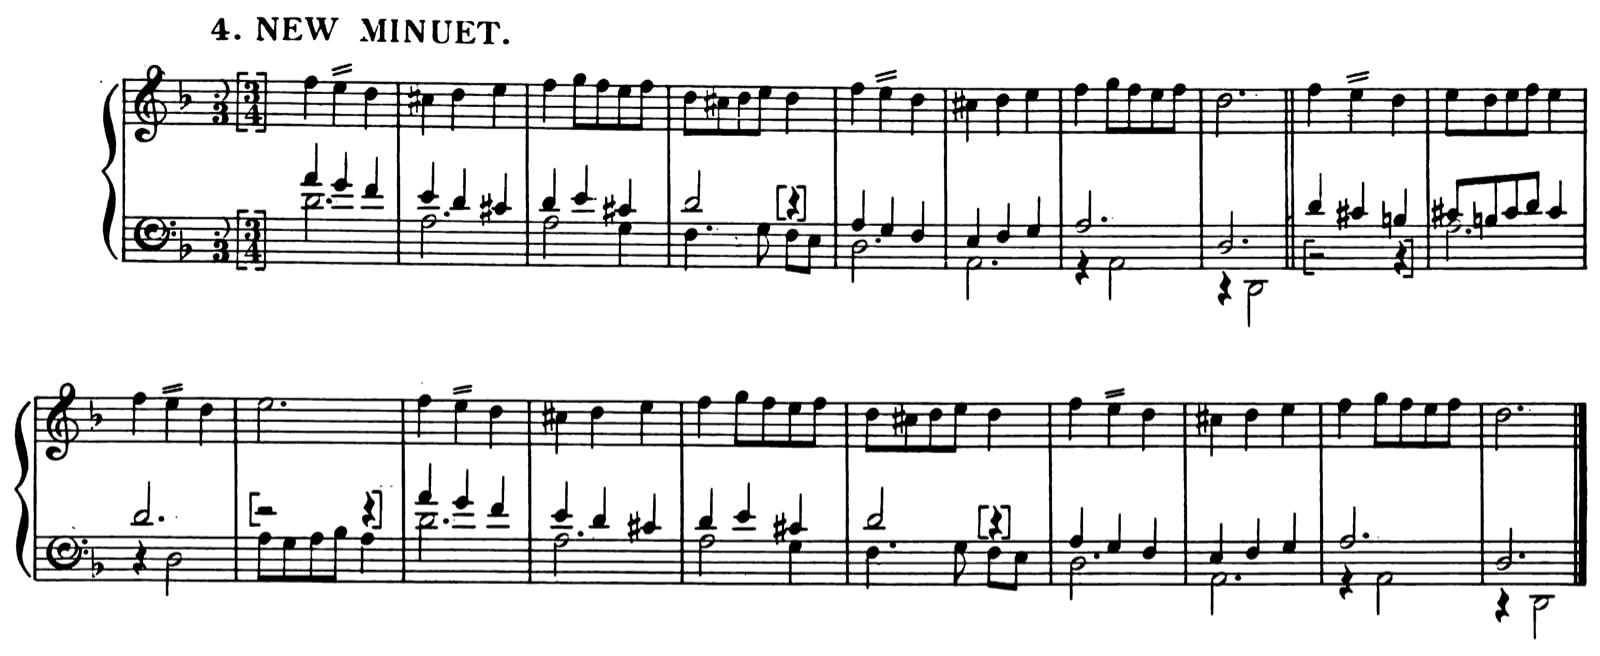
5. Henry Purcell: Minuet in D Minor T689
The melody of this beautiful minuet uses exclusively the rhythmic values explored in this lesson. It is composed with only 3 phrases that are 4 bars each, that we will call a, b, and c. Thus the form of the piece is ababcab.
New Minuet
ZT 689
Henry Purcell
Place on the floor as many hoops as there are people, spread around the room. Students go for a walk and come back to their hoops at the end of each phrase. Depending on the phrase, they will do something different when arriving to their hoops:
Do a pirouette or a turn on one feet inside the hoop
Arrive with both feet
Arrive tip toe close to the hoop without getting inside
Have the students describe in their own words how the phrases endings feel different from each other, sensitizing them to the different cadences. Then repeat the piece a few times and help them integrate the form.
Optional: for older students, read the melody in solfège. The piece is written in 3-part, so for more advanced students, it can also be read in 3 voices.
Learning Objectives: Explore measure, beats and divisions in 3/4 in the context of Purcell’s Minuet
This lesson plan by Dr. Annabelle Joseph is based on the notes I took during my Dalcroze training at Carnegie Mellon University. I “rescued” my notebooks from that period and I found the following from 1999. At that time, students took notes quickly between lessons. The annotations I write now come from my memories and my teaching experience at the present.
This is an introductory lesson to measures of 12 eighth notes and their common groupings. Once this is mastered, the next stage could be to work on a specific rhythmic pattern one measure in length and to practice with different groupings of the twelve eighth notes, thus changing the natural rhythmic “accents” of the pattern.
Student 1 improvises a variation of the original melody
Student 2 improvises a bass line
Group sings original melody pianissimo
New pair of students come to the piano
Group sings original melody
Student 1 improvises a variation in a second voice canon
Student 2 improvises a NEW melody in a third voice canon
Repeat the same exercise with different students
Three-voice canon
Divide group in 3 and sing a 3-voice canon a cappella10
Voice 1 sings the original melody
Voices 2 and 3 improvise new melodies in canon
Change roles
Move and conduct in space while singing
Ev’ry Night When the Sun Goes In
Traditional Appalachian
Commentary by Elda Nelly Treviño Flores
The theme of part one of the lesson is different groupings of 12 eighth notes in a measure. The teacher plays improvised music at the piano, unexpectedly changing between groupings of 2, 3, 4, and 6 eighth notes. Students walk the eighth notes while conducting according to the heard groupings, thereby changing meter. ↩︎
This exercise is a variation of the previous one. Students step the eighth notes (at a faster tempo than the previous exercise) when no grouping is heard. Once they hear a grouping or subdivision in 2, 3, 4, or 6, they stop running and show, using free movements, the beats of groups of eighth notes. ↩︎
One of the hallmarks of Dalcroze pedagogy is to combine individual and group work. This exercise is more challenging than the previous ones; for the exercise to work, the inner pulse of the team must be the same, and the movements to pass the ball must be gentle and flow among all the participants. Moreover, the quick-reaction response is very important to maintain the quality of the direction change. ↩︎
This exercise goes back to individual work with the addition of arm movements. Both hands and feet show the eighth notes alternating with one another. When hands have the eighth notes, the feet will perform the grouping, and vice versa. (This is a dissociation.) The rhythm sticks facilitate listening clearly to the rhythmic figures. ↩︎
One common strategy in Dalcroze pedagogy is the creation of a series of specific patterns, both rhythmic and/or melodic, to develop automatization and memory skills. In this exercise, the series is done twice by each member of the group. Then the series is done only once, and each person decides who does it next. The passing of the series must be done with eye contact between the person who does it and the person who receives it. Eye contact prepares the passing of the series and helps to maintain the flow of the exercise. ↩︎
The purpose of this exercise is to create a polyrhythm in space with arm movements showing the different groupings of eighth notes within a measure of 12 eighth notes. Once the arm movements are worked through, voice sounds are added to those to create an auditory polyrhythm as well. Different poses or group configurations may be created by the teams to show the eighth-note groupings. ↩︎
Part 2 of this lesson is designed to develop improvisation skills and is based on a given well-known melody. It also gets the Mixolydian mode in the ear. The lesson is designed for early intermediate students. ↩︎
Another skill to learn in this lesson is to quickly memorize a melody and think of its harmony as well. One of the most challenging aspects of piano improvisation is to create a good bass line. Since most of the work through the lesson is done in pairs of students, the challenge is easier to manage. ↩︎
This exercise develops the ability to listen to three different voices simultaneously. Since the song is already known, as the lesson progresses, it becomes more comfortable to improvise variations. The original instructions do not specify the use of certain rhythmic patterns only; however, with this restriction, the challenge level increases. ↩︎
Even though the lesson is for piano improvisation, not voice, it is important to emphasize singing in tune. If a person imagines and sings a good melody in tune, then they will be able to improvise at the piano. Inner hearing is essential for developing improvisation skills both with the voice and at any instrument. To make this exercise more physical, one or two students could improvise a line with movements. ↩︎
Allow parts of the body to move you to seated position and then standing.
In pairs, student A taps student B, student B follows through
Move it in space
Around the circle: Bat an invisible volleyball across the circle, with a set up and a release.2
Movement and mime
Add sound
Set up = anacrusis (upbeat, pick up) Release = crusis (downbeat)
Names around circle, in {4/4}
Speak the name of neighbor on the crusis
Add anacrusic greeting before the crusis i.e. “Hello, John”: {ee | h}
Stepping patterns
Step the beat and clap crusis, eventually to a passerby. Piano is in {4/4} with lots of different anacruses.
Clap anacruses; clap cruses to passersby. Establishthe systemization3 (x = crusis in {4/4}) {q | x ee | x e ee | x ee ee | x}
Notate
Step the patterns of the systemization, gesturing to a passerby on the crusis
Call attention to introverted movement (i.e. moving in one’s own space, with peripheral awareness of others, but essentially alone) and extroverted movement (i.e. moving with awareness of others, interacting, moving toward others).
Move again with this in mind.(Introvertedmovement tends to be small and enclosed; extroverted movement is larger, and it causes the body to move toward—and interact with—others.)
Watch each other in half groups, enabling a clear visual sense of introverted and extroverted movement.
“Wayfaring Stranger”
Teacher plays, students step: {e ee} | {htiee} This becomes a follow.
{e ee | e q.} The new note ({q.} ) is a metacrusis (a note or notes falling away from the crusis)
Although the actual measures start at the barline, thevirtual measures of an anacrusic piece start with the anacruses. The form of the virtual measures is abaa.
Hand out score and sing with lyrics. Discuss the meaning of the lyrics.
Wayfaring Stranger
with complementary rhythm (C.R.) at the beat and division
Traditional Spiritual
Analysis of measure shape with lyrics
Not all words will fit into the analyzed measure shape structure, so in some phrases, the measure shape will change.
Example: mm. 5-7 “And there’s no sickness toil or trouble”en \hUeen \ej
Here, the metacrusis is on “ness” followed by an anacrusis of only two eighth notes.
Sing the song again
Sing with a student conductor, being aware of the measure shape phrasing.
Complementary rhythm
The complementary rhythm (c.r.) is the pulse that happens where there are no new notes (either from a rest or a long note).
At the quarter-note level:
Clap the pattern of the song, step the beats. Identify the steps where there are no claps: that’s the complementary rhythm at the quarter-note level.
Step the complementary rhythm while song is played.
At the eighth-note level:
Clap the pattern and step eighth notes, discovering the complementary rhythms at the eighth-note level.
Step this complementary rhythm
Do in partners, person A steps and/or claps the pattern, person B steps and/or claps the complementary rhythm.4
Solfège
Sing the melody with scale-degree numbers
Determine that the 2nd and 6th degrees of the scale are missing, so that the song is in the minor pentatonic. There are no half steps, and thus no half step dissonances.
Then sing in syllables
Sing the song in canon.5 Although the song is not purportedly a canon, it makes an effective canon because there are no half step dissonances.
Sing in canon in two parts at a distance of two beats, becoming a sort of call-and-response.
Sing in canon in three or more parts one beat apart, creating a pentatonic cluster.
Anacrusic Systemization
Commentary by Katie Couch
This introduction includes aural reactions (responding to music), tactile reactions (responding to physical sensation), and locomotor gestural movement, where students use previously explored gestures to travel through the space. ↩︎
This is a game that explores time/space/energy while also incorporating social interaction and vocal improvisation. ↩︎
It is important to explore a wide variety of anacrusic rhythms before arranging them into a systemization. ↩︎
Performing complementary rhythms in a small group can evoke the feeling of a folk dance, with each part contributing to a lively, interlocking texture. ↩︎
Students could also move in canon while singing in canon, creating a process-based plastique animée that allows them to see and hear the music unfolding at different times. ↩︎
“When I say change, change between your hands and feet.”
It’s not often that we encounter a eurhythmics lesson without hearing one of these quintessential phrases. They are an integral part of a eurhythmics class and an indicator that students are experiencing one of several frequently used pedagogical strategies: association, dissociation, or quick reaction. Each is a powerful teaching tool for the Dalcroze educator.
Association
when an element (musical or otherwise—a beat, a rhythm, a touch, or a gesture) occurs exactly the same way in two or more voices simultaneously
A teacher plays a pattern and the students clap it; student A draws a line through space and student B mirrors it; a class sings in unison while clapping the rhythm of the song they are singing. These are all examples of association experiences in a class.
Associations provide foundational listening and movement experiences for students; they are building blocks. After teaching college students for over thirty years, I know that students love demanding physical and musical exercises, but I’ve also learned that simplicity matters; associations provide simplicity. I use associations in multiple ways in a class.
To introduce a new topic
When teaching students who are experiencing eurhythmics for the first time, I use association between the piano and their stepping or clapping to introduce the beat in the simplest, most direct way, playing only what students will clap or step. This builds confidence and sets the stage for success while simultaneously teaching students that the piano provides structure and guidance in the class.
I often use the same technique when introducing a new topic; my goal is for students to experience a series of small successes as we gradually build to the big challenge over the course of a lesson.
To set the stage for a more difficult exercise
Imagine your lesson plan or long-term goal includes using a follow in class. My motto is “every good follow begins with a follow.” In a typical follow, students step a rhythm or pattern, and the teacher improvises over it with increasing complexity, using syncopations, hemiola, character changes, and other musical elements. Students need to hang on to the rhythm, stepping accurately and musically throughout the exercise.
I prepare students for successfully executing a follow by playing exactly what the class steps, first in a simple, pure way, gradually adding different dynamics, characters, etc., but still playing only the rhythm. This helps hone their listening skills and adjust to changes in tempo and character without added rhythmic complexity.
To expand a group’s movement vocabulary
Sometimes, students need ideas to spur their movement vocabulary, and I use an association exercise to lead them down a new path. Most often this is as simple as asking students to imitate a gesture I create. (Because the association is with gestures, I refer to this as a physical association rather than an association between a musical element.)
Eventually, I say, “Ok, you’re on your own,” or “Pair with a friend; choose a leader and copy what you see.” I then go back to the piano to improvise as they continue exploring.
Dissociation
when two or more different elements occur simultaneously
The dissociation may occur between what I play and what students step (I play divisions, they step the beat, or I play triplets, they step divisions), between their hands and feet (they step the beat while clapping the multiple), or between a gesture they see and how they move (their partner’s arms may gesture overhead while theirs move out to the side). A dissociation raises the level of difficulty of an exercise, requiring more concentration and coordination from participants.
Experiences in dissociation encourage physical and aural awareness and are essential to high-level music making. We live in a complex, polyphonic world, and musicians need to develop the ability to perform their part while actively listening to the music happening around them. Jaques-Dalcroze offers this perspective in Rhythm, Music and Education:
One can imagine counterpoints of all kinds. The interesting and useful thing is to experience—live—them organically. Polyrhythm is facilitated by the cultivation of automatisms. An arm will execute a rhythm automatically while the mind executes the execution of a second rhythm by another limb.
Just as with association, I use dissociation exercises to teach a specific skill (e.g., beat/division/multiple) and also as a starting point for more complex exercises, like a quick reaction, canon, or follow. When using this strategy in class, it’s paramount for teachers to recognize that they have the power to either set students up for success or utterly overwhelm them. I work hard to ensure my students have enough experience with each element of the dissociation before I ask to combine them.
For example, we’ll clap and step the beat, then clap and step divisions; once this is comfortable (becoming an automatism), I may add a layer and ask students to clap the divisions while I play the beat, then switch between the two. Some classes need an additional step of pairing students, with each partner performing one of the rhythms (giving the added benefit of social interaction). Once they master each step—which may take three minutes or thirty, depending on the group—they perform the dissociation independently. Typically, I start with the more “solid” (most often slower) element in the feet and the quicker in the hands before asking the students to change.
1
Dissociation Examples
Example A: Teacher plays the subdivision, students step the beat
Example B: Students clap the upper rhythm, step the lower rhythm
Dissociation exercises turn from moments of challenge to moments of pure joy in a eurhythmics class, particularly when students are asked to perform complex dissociations. I remember well the first time I was asked to step amphibrach (a syncopated rhythm pattern) tempo primo in my feet and twice as fast in my hands. Despite careful preparation by my teacher, it seemed impossible! Eventually, as I mastered the skill, the sense of accomplishment and joy I experienced was palpable. I’ve watched the same transformation in my students over the years; I think it’s one of the secret rewards of our work.
Reassociation & Automatism
when a dissociation becomes easy—an exercise we can execute without effort or thought—it is a reassociation
A reassociation creates freedom and enhances the spirit of play for students of any age and level. It becomes, in fact, an automatism, something we can execute completely without thinking, often while focusing on or simultaneously performing something else. Simply put, automatisms are the Dalcrozian’s answer to multitasking. Automatisms allow us to shift our focus from one task to something new or more difficult and to trust our physical capabilities.
Do I use automatisms in class in the same way I use other strategies? No. Mostly, they are something I observe, a sign I can challenge students with a more difficult exercise. But I can’t imagine executing many other exercises—a dissociation, ostinato, canon, polyrhythm—without the benefit of an automatisms.
Jaques-Dalcroze understood the vital role automatisms play in our daily lives. In Rhythm, Music and Education, he wrote, “The better our lives are regulated, the freer we become in every way. The more words are included in our vocabulary, the more our thought is enriched. The more automatism possessed by our body, the more our soul will rise above material things.”
Eurhythmics students work to automatize the Dalcroze arm beats in 5. Photo by Kathryn Nockles.
Quick Reaction Exercises
If there is a classic exercise in the eurhythmics experience, the quick reaction may be it.
I remember my first eurhythmics class when my teacher said, “And when I say ‘change,’ you’ll change between hands and feet.” My eyes got big and I thought, “You want me to do what?” I never thought this was a skill I could master, and certainly, in that moment, I never realized how much fun quick reaction exercises could be. Musicians need to be flexible, ready for change, and prepared for the unpredictability of performance. Quick reaction exercises serve to develop these skills while allowing teachers to reinforce new concepts and build the level of challenge in a class.
In a quick reaction exercise, the teacher uses a signal to motivate a change in movement through one of four means: verbal, aural/musical, visual, or tactile. Each challenges students differently and develops other skills, such as listening, coordination, and concentration, in various ways.
Verbal Quick Reaction
Here, the teacher (or a student) gives a verbal cue (“change,” “hip,” “hop,” etc.) to stimulate change. The frequency of the signal is one component that determines the level of difficulty of the exercise. When I’m introducing a topic, I may signal change at the end of a phrase; as students master the skill, I increase the frequency to add a layer of difficulty.
One of my favorite things to do in a class is to choose an interval (each measure, for example) to say “change,” to set up a habit, then change the interval at which I give the signal. Invariably, students have been lulled into believing the pattern will last forever and get surprised by the sudden lack of change! It’s always a great reminder for them of how musicians can’t stop listening, thinking, and reacting. Unpredictability is fun.
2
Verbal Reaction Exercise
Aural/Musical Quick Reaction
Laced into the teacher’s improvisation, an aural quick reaction uses music to signal a change. An easy example of an aural reaction is playing for a locomotor skill—a march—then changing to another—a skip—using only the music as a guide. No words!
The possibilities are endless: Music in major may indicate stepping forward; in minor, backward. Three notes played in the bass might indicate tapping the floor; a trill in the soprano means turn around or change direction. Aural reactions are fun and help develop listening skills.
3
Aural Reaction Exercise
Visual Quick Reaction
Here, students need to watch the teacher (or a partner) to execute a change.
The teacher might tap beats on their head, and students imitate. Then the teacher switches to shoulders, then knees, and students make each change with them.
A more challenging visual reaction might use gestures to indicate specific rhythm patterns. For example, in compound meter, arms overhead indicate divisions; arms extended down, the beat; out to the side, a skip; and in toward the chest, short-long. The class claps or sings the rhythm as the teacher moves between patterns; a student could lead the exercise while the teacher plays, leading to interesting experiences with phrasing and cadences. To add another layer, split the class in half. One group watches the right arm; the other, the left, and magically, the quick reaction also becomes a dissociation exercise.
Visual reactions can be helpful to change the pace of a class, or to use when the teacher feels a need to be with the group physically rather than at the piano. They provide opportunities for students to lead an exercise. They also help students learn to “hear” music in their heads when it’s not being provided for them, enhancing their musical imagination and providing a pathway to improvisation.
Tactile Quick Reaction
Here, the signal for change is indicated by touch. This may be the least frequently used type of reaction, but, like an aural/musical cue, is an effective way for teachers and students to communicate without words.
Imagine students seated in a circle. One person walks around the outside of the circle. If they tap someone’s head, that person claps the beat; shoulders, divisions.
Another possibility: in pairs, one student taps beats (or a pattern) on the shoulder of their partner, who responds by clapping, articulating, or improvising a melody in rhythm.
A fun exercise is to place students in a line. The student in the back taps a rhythm on the person in front of them, who does the same to the person in front of them; when the teacher says “change,” everyone turns around and the rhythm “changes” direction. Warning: silliness can easily ensue!
Placing the signal to change is essential to successful execution of any quick reaction exercise. Give the cue too soon and students may try to change before it makes musical sense; too late, and the teacher sets the class up for failure. When I execute a quick reaction in class, I think anacrusically so that placement of my signal aligns rhythmically with the musical element.
Closing Thoughts
Association/dissociation and quick reaction exercises are closely related: an association may quickly turn to a dissociation as the teacher starts to improvise over a rhythm and layers a new skill; that dissociation may then become the basis for a quick reaction exercise. These strategies teach listening, coordination, concentration, and memory and are a valuable asset in a eurhythmics teacher’s cache.
References
Émile Jaques-Dalcroze, Rhythm, Music and Education, trans. Harold Rubenstein (Ashford, Kent: The Dalcroze Society, 1967), 70.
This activity uses the first four notes of the scale, beginning on the tonic. I typically introduce this at the start of class, where I tend to focus on solfège.
Students sit in a circle. One at a time, each student becomes the leader and improvises a short scale-based melody using rhythmic units they’ve previously worked on in eurhythmics.
In simple meter, the rhythmic units may include:
{q} Quarter notes (“beat”)
{ee} Paired eighth notes (“2-8”)
{ssss} Four sixteenth notes (“boomachicka”)
In compound meter, the units may include:
{q.} Dotted quarter (“beat”)
{eee} Three eighths (“running and”)
{qe} Quarter–eighth pattern (“skip and”)
Each unit has a rhythmic word associated with it, which students vocalize while singing. The leader sings a rhythm using these words and moves up the first four notes of the scale, one rhythm per note, filling each beat accordingly.
The rest of the class then sings the pattern in reverse, moving down the scale using the same rhythmic structure. For a more advanced version, the group can begin on the 5th scale degree (^5) and descend to the 2nd (^2). Everyone then sings the tonic on a sustained pitch using a long-note word like “long,” “whole,” or “half.”
an activity in which a leader provides a verbal, aural/musical, visual, or tactile signal to prompt an immediate response, such as a change in movement
The teacher plays a drum and a triangle (or any kind of other hand percussion)
ONE drum sound = step forward
TWO drum sounds = step back wards
THREE drum sounds = stop
ONE triangle sound = leap forward
TWO triangle sounds = leap backwards (this may need some practice)
THREE triangle sounds = stop
Activity
The teacher sings short phrases with music going up or down stepwise. Teacher uses one hand (or both) to show imaginary steps in the space. Students echo.
Teacher does the same with skips (a third or more)
Exploring the piano/glockenspiel/xylophone:
Music going up or down stepwise
Music going up or down, skipping keys
Students take turns exploring
In space:
Piano plays music going up or down stepwise, students step forward or backwards
Piano plays music skipping up or down, students leap backwards or forwards
Conclude by singing a song in which one or more of these are elements of melodic direction are represented.
This is a lesson plan I might use in the beginning of the year. In my school, some students will be brand new to music lessons and Dalcroze, some will be experienced at both, but most will be in between. I try to plan activities that will allow me to gauge their experience levels and their comfort with movement and singing.
In the first few weeks, I try to incorporate dynamics and tempo into the mix, even if the main subject is something more rhythmic or metrical. In this lesson there is a lot of either matching or not matching something or someone (also something that happens a lot in the beginning of the year.)
This age loves to be goofy, has a passion to be “right,” and loves knowing and exploiting rules. They have a need for independence tempered by a strong desire not to stand out from everyone else. Yes, there are contradictions! Even though I don’t always get the balance between playfulness and challenge right, it is one of my favorite ages to work with.
Lesson Plan
Movement warm-up: Dynamics
Practice making poses with 4 body parts touching the floor; 3 parts touching; 2 parts and finally 1 part.1
Association: When the music is {f}, make poses with 4 parts; {mf} = 3 parts; {mp} =2 parts; {p} =1 part.2
Tempo
Move a different tempo (or way) from everyone else. If you think the piano is playing your tempo, continue. If not, stop.3
Beat & division of 2 in simple meter
Reaction (and inhibition): Move the beat with locomotor or non-locomotor movement as you like. When you hear a set of two divisions (for example {ee} with a {q} beat), stop. When you hear another set, start again.4
Group activity with Rondino by Daniel Gottlob Türk5. Partner A is the left hand, and partner B is the right hand. When the rhythm is the beat ({q}), walk; when the rhythm is divisions of 2 ({ee}), orbit your partner as they walk.
Notate examples of beat and division on the board; students speak with desired rhythmic language rhythmic unit that is being pointed to.
Variation: make two groups (and two sets of rhythms on the board); each group follows their leader, speaking (or playing with percussion) the desired rhythmic unit.
Dissociation: practice stepping beats and (with sticks or chopsticks) clicking the divisions. Practice the reverse.
Variation: (reaction) “Change” = reverse hands and feet.6
Lie down. At the signal, hum a sound as softly as you can, for as long as you can. Repeat with different pitches, adding the following variations:
While humming your pitch, see if you can hear your neighbor’s pitch.
If you think your pitch is higher than your neighbors, raise both hands; if lower, cross both hands; if the same do nothing.
Slide up or down until you think you are singing the same pitch as your neighbor.
Rondino
Group Activity Example
Daniel Gottlob Türk (1750–1813)
Commentary
I let them experiment on their own for a while, encouraging as many possibilities as possible, hoping that they get a good stretch too! ↩︎
I sometimes improvise at the piano for this one; I have also used Brahms’s Hungarian Dance No. 5 successfully. ↩︎
I encourage them to watch each other carefully, so that they truly have a unique tempo. This promotes a kind of “active watching” along with their active listening. ↩︎
This age loves this game: it isn’t overly expressive; there is a clear way to “get it right”; and if they are unsure, they can immediately see when to stop and start by watching their peers. ↩︎
This piece has a good mix of quarters and eighths in both hands with just the right amount of predictability. You might only be able to get the first 8 or 16 bars with some groups. ↩︎
Try this variation only if the class has good facility in both configurations. ↩︎
Even children who are advanced musicians will sometimes be very self-conscious singers. In the beginning of the year, I like to do very exploratory vocal exercises so that they begin to get more comfortable with their singing voice. In addition to giving them a chance to cool down, this also gives me clues as to pitch perception. ↩︎
In this Dalcroze Eurhythmics quick reaction game students learn to internalize tempo quickly when they are asked to jump so that they land on the fourth note that is played. It is being taught by Dr. Gregory Ristow, a Dalcroze teacher who is assistant professor of music and director of choral activities at DePauw University.
The paintings visible in the background are Billow and Five Dogwoods by artist Nancy Blum, on display in the Colorado State University Art Museum. (The DSA offers its thanks to the museum staff.)